
It’s always nice to have a friend who can help you out once in a while. It’s even nicer to have a friend who can help you out 24 hours a day, who never gets tired or bored or sick, who is focused 100% on helping you do what you need to do.
Slackbots can be such friends for you. Setting up a slackbot is easy, and we will show you how to build your own helpful slackbot in 7 simple steps:
- Get your Slack API Key
- Add a New “Bot User”
- Setup Your Project
- Import Dependencies
- Handle Slack Messages
- Recognize Users (and the Bot)
- Give Your Bot Some Personality
Let's get started!
Step 1: Get your Slack API Key
The first step in creating a slackbot is to create a new Slack app - Slack apps can do and be a lot of different things (such as be a bot in our case), but all of those things require a Slack API key to function.
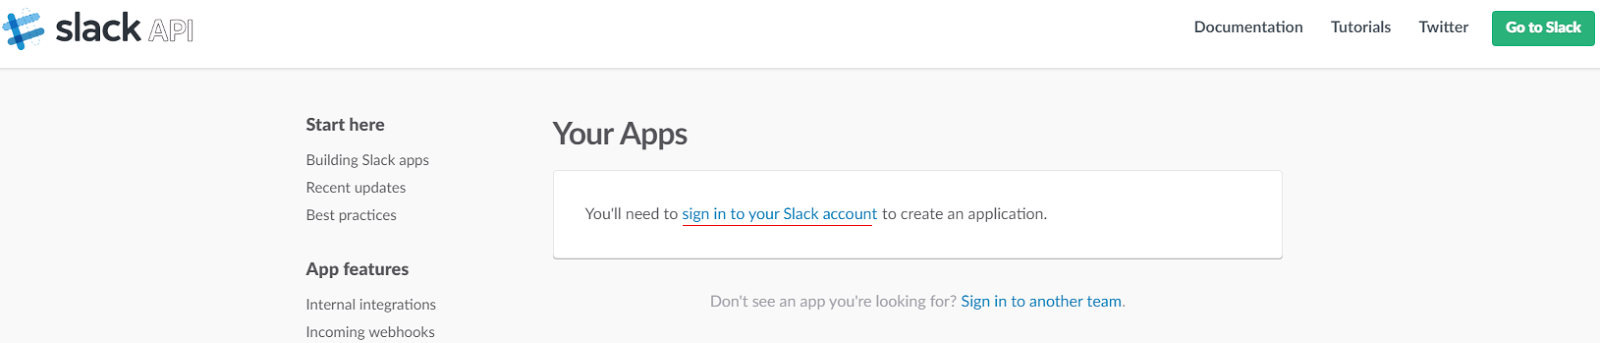
To get an API key, first go to the Slack apps management page.
If you aren’t signed in, click ‘sign in to your Slack account’ to manage your team’s apps.
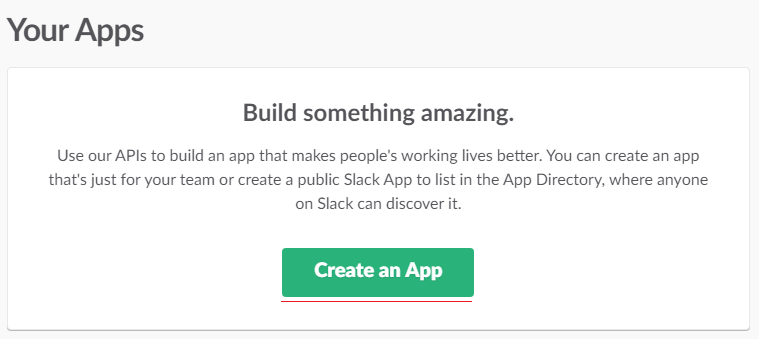
Once you’re signed in, click the ‘Create an App’ button in the middle of the screen.
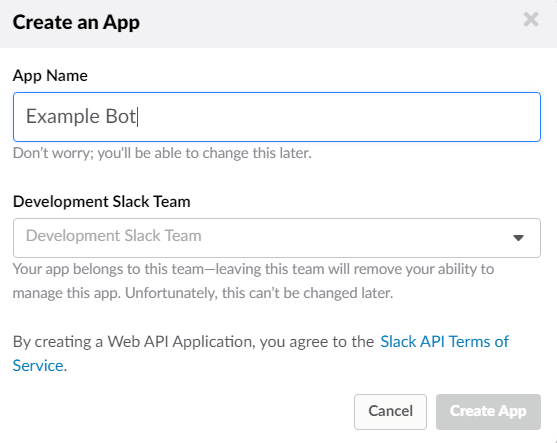
(If you’ve created a Slack app before you’ll find the button in the upper-right corner). Give your app a name, such as “Example Bot”, and choose the Slack team where you want it the app installed.
Once you click ‘Create App’, you’re good to proceed! We’ve just generated an API key so that our slackbot can interact with everything that Slack has to offer. The next thing to do is to create an actual bot user, built with the API key we just generated, and add it to our Slack team.
Step 2: Add a New ‘Bot User’
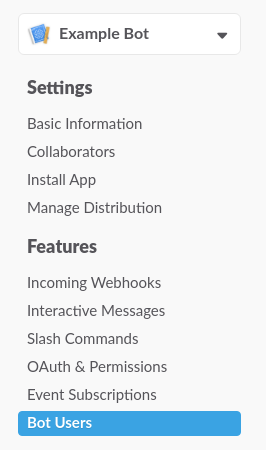
To add a new bot user, select ‘Bot users’ under the features heading on the left-hand side navigation of the app configuration page.
Click the ‘Add a bot user’ button and give it username, such as @example_bot.
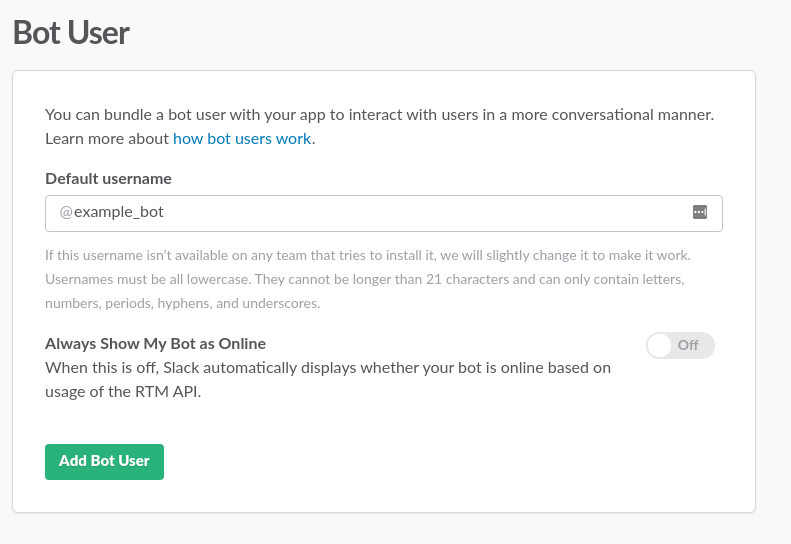
Keep the ‘always appear online’ slider in the off position (we want our slackbot to appear offline if it crashes) and then click the add bot user button.
Finally, we have to give our slackbot access to slack with our API key. Select ‘OAuth & Permissions’ under the features heading on the left-hand side navigation of the app configuration page and click the ‘Install App to Team’ button.
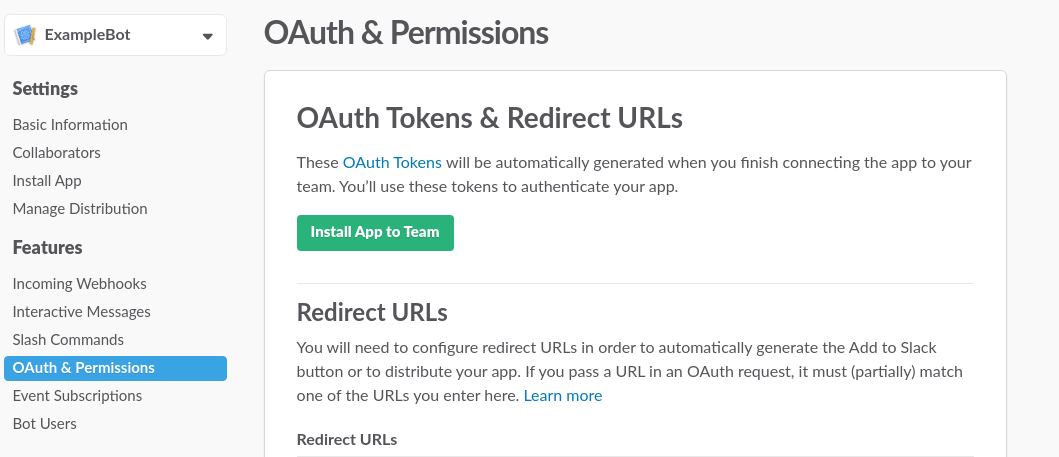
After you authorize the slackbot, you will then have access to the OAuth tokens - click ‘copy’ next to the slackbot user OAuth token to get the token on your clipboard!
Now we're ready to begin coding!
Step 3: Setup Your Project
Create a new directory where you’d like to put your code. Open a Terminal (be sure to have node.js installed), navigate to this new directory, and run
npm init
to create a new Node.js project. Then, run the following
npm install @slack/client --save
to install the necessary dependencies.
Next, in the same directory, create a new JavaScript file called ‘bot.js’ and open it up in your favorite text editor or IDE.
Step 4: Import Dependencies
The first thing we need to do is make sure that we import all the dependencies that our slackbot will need to do what it needs to do. Let’s do so by adding the following lines of code.
const RtmClient  = require('@slack/client').RtmClient;
const WebClient  = require('@slack/client').WebClient;
const RTM_EVENTS = require('@slack/client').RTM_EVENTS;

const bot_token = 'your-token-here';
const rtm       = new RtmClient(bot_token);
const web       = new WebClient(bot_token);
Here’s what the code above is for:
RtmClient is the real time messaging client for slack - we’ll use it to do things like send and receive messages.
WebClient is the web client for slack - we’ll use it for api calls that don’t have to do with sending or receiving messages in real time.
RTM_EVENTS contains the events that the rtm client will interpret and respond to. We’ll get to examples shortly!
bot_token is where you specify the api token that you generated at the beginning of the tutorial.
rtm andweb are the actual clients that we’ll be using for our slackbot, both initialized with our api token.
Step 5: Handle Slack Messages
Let’s take a look at how to handle some messages. Write out the following in the same manner as above:
rtm.on(RTM_EVENTS.MESSAGE, function handleRtmMessage(message) {});
rtm.start();
rtm.on , the response function, attaches an event handler to the real time message client.
RTM_EVENTS.MESSAGE indicates that a message was received, and handleRtmMessage(message) allows you to process and respond to that message.
rtm.start() starts the slackbot.
Next let’s flesh out the response function a little bit. Modify the above code to look like the following:
rtm.on(RTM_EVENTS.MESSAGE, function handleRtmMessage(message) {
    if (message.type === 'message' && message.text) {
        console.log(message.text);
    }
}
Now the function will check and make sure that the message is of ‘message’ type (as opposed to a gif or another api call) and that there is text in the message, and if both of these conditions are met then it will log the message to the console.
Right now our slackbot is just logging incoming messages to the console, which isn’t very interactive. Let’s make things more interesting by having the bot echo messages back into the channel.
rtm.on(RTM_EVENTS.MESSAGE, function handleRtmMessage(message) {
    if (message.type === 'message' && message.text) {
        rtm.sendMessage('You said: ' + message.text, message.channel);
    }
}
rtm.sendMessage is how the slackbot sends a message to a particular Slack channel. Remember to invite the bot to the channel you want it to participate in.
rtm.sendMessage takes two arguments - the message to send, and the Slack channel to send the message to. The Slack channel can be found in the message.channel property.
For Code Hangar’s Goldenboy, we use colons to specify a command. For example sending a message saying
issue: goldenboy needs more personality
will create a Github Issue saying that Goldenboy needs more personality. This is because the slackbot recognizes the colon, reading the text preceding the colon as the command and the text after the colon as the value for the command.
Here’s what that looks like in the code:
const allCommands = ['issue', 'command2'];

function executeCommand(command, args) { // this function processes commands
    console.log(command, args); // for now it just logs them to the console
}

rtm.on(RTM_EVENTS.MESSAGE, function handleRtmMessage(message) {
    if (message.type === 'message' && message.text) {
        if (message.text.indexOf(':') !== -1) {
            allCommands.forEach((command) => {
                if (message.text.indexOf(command) === 0) {
                    const args = message.text.substring(command.length);
                    executeCommand(command, args);
                }
            });
        }
    }
});
Here we have allCommands, which contains an array of the commands that our slackbot will recognize.
The function executeCommand takes the command, and it's following text as its argument and then does something with that command - for now it just logs it to the console, but you can add logic to it to make it much more interesting.
With message.text.indexOf(':') !== -1, the slackbot checks to see if the message contains a colon (and thus a potential command). If it contains a colon it then checks the full list of commands to see if they are present.
Step 6: Recognize Users (and the Bot)
The next thing to do is to make our slackbot self-aware, responding to its name and making sure that it doesn’t respond to messages that it sent itself. Slack assigns users a unique id, and the api uses this id rather than the usernames themselves. So, in order to make it so the bot can recognize users (including itself), we’ll have to get the user ids from the channel and associate them with their respective usernames.
We’ll need some new functions to do this. Add the following functions before your rtm.on function:
let users = [];

function updateUsers(data) {
    users = data.members;
}

function getUsernameFromId(id) {
    const user = users.find(user => user.id === id);
    return user ? user.name : 'unknown member';
}
The first function, updateUsers, updates our global users variable from a web api call that we’ll define below.
getUsernameFromId takes a user id and gets its associated username from the users variable.
Next, add the following after your rtm.on function and before rtm.start:
web.users.list((err, data) => {
    if (err) {
        console.error('web.users.list Error:', err);
    } else {
        updateUsers(data);
    }
});
web.users.list is a web api call that lists all of the users in the channel. If successful, it returns a JSON object that gets passed to updateUsers, a function that we wrote.
updateUsers assigns this JSON object to a variable so that we can use it within the slackbot itself.
Finally, getUsernameFromId is called whenever we need to look up a username that corresponds to a given id.
Let’s see these in action.
const robotName = 'examplebot';

rtm.on(RTM_EVENTS.MESSAGE, function handleRtmMessage(message) {
    if (message.type === 'message' && message.text) {
        const userName = getUsernameFromId(message.user);
        if (userName !== robotName) {
            if (message.text.indexOf(':') !== -1) {
                allCommands.forEach((command) => {
                    if (message.text.indexOf(command) === 0) {
                        const args = message.text.substring(command.length);
                        executeCommand(command, args);
                    }
                });
            }
        }
    }
});
Here robotName is the name of the slackbot. The code then checks to see if the incoming message was NOT sent by the slackbot, getting the message sender’s username with the getUsernameFromId function specified above.
Step 7: Give Your Bot Some Personality
Now, we can make it so that the robot gets a little feisty when its name is mentioned.
const robotName = 'examplebot';

rtm.on(RTM_EVENTS.MESSAGE, function handleRtmMessage(message) {
    if (message.type === 'message' && message.text) {
        const userName = getUsernameFromI'xoxb-138883194769-WyyoRghxFHNhqPs9DVpIk24U'd(message.user);
        if (userName !== robotName) {
            if (message.text.indexOf(robotName) !== -1) {
                rtm.sendMessage('Hey ' + userName + ', I heard that!', message.channel);
            }
            if (message.text.indexOf(':') !== -1) {
                allCommands.forEach((command) => {
                    if (message.text.indexOf(command) === 0) {
                        const args = message.text.substring(command.length);
                        executeCommand(command, args);
                    }
                });
            }
        }
    }
});
The new code makes it such that the slackbot will recognize its own name and respond!
Here’s what the code looks like all put together:
Our Goldenboy operates by these basic principles! To check it out for yourself or to install a full-featured Goldenboy of your own, go to Goldenboy’s Github page and click ‘deploy to Heroku’.
Let us know if you have any questions in the comments below! Thanks for reading!
About Author: Max Jackson

Writer, Programmer, Brain Scientist, Unreconstituted Class Warrior